I had the most horrible experience trying to setup a verified publisher with my Entra External ID. Now I am writing a blog post about it, in case someone else like me is pulling their hair; probably future me finding this post through DuckDuckGo.
Why do you want a verified publisher with your Entra External ID Application Registration?
What happens if you don’t get a verified publisher? When your users are going to register to your application, they will give consent on the data being shared with the application, and there it will say that the application is not trusted.
For dev/test environments this doesn’t matter much, but for production environment and real users, this is a big deal. So you need to get a trusted verified publisher to your login. This article is going to explain how to do that.
Why was this so hard?
There are several things that made this much harder than it should’ve been
Documentation takes for granted you’re doing this on your main Entra ID tenant and not Entra External ID
Most examples are using the same domain for the tenant as for the Partner Network registration
The UI is very confusing and sometimes buggy
So you should read this article if you
Want to setup a verified publisher for an Entra External ID
You want to use a completely different domain for your tenant
Want som help navigating the disturbingly convoluted UI
1. Register for Microsoft Partner Center
If you have a small startup like mine, you are probably not registered with Microsoft Partner Network. That is fine, you go here and start the onboarding.
I was not anticipating having this much trouble that I wanted to write a blog post about it, so I didn’t document the process, but it was pretty straightforward.
2. Associate the Entra External ID tenant with your Microsoft Partnership
There is an issue that I don’t think that Microsoft have thought about. In a big enterprise organization this is not a problem, but if you are the same person setting up the Microsoft Partnership as creating the Entra External ID tenant, the association in the Microsoft Partner Central will not work for you.
First you need to setup a Global Administrator account in your Microsoft Entra External ID tenant that is a local account to that tenant. You can use this opportunity to create a “Break The Glass” account that you will need anyway.
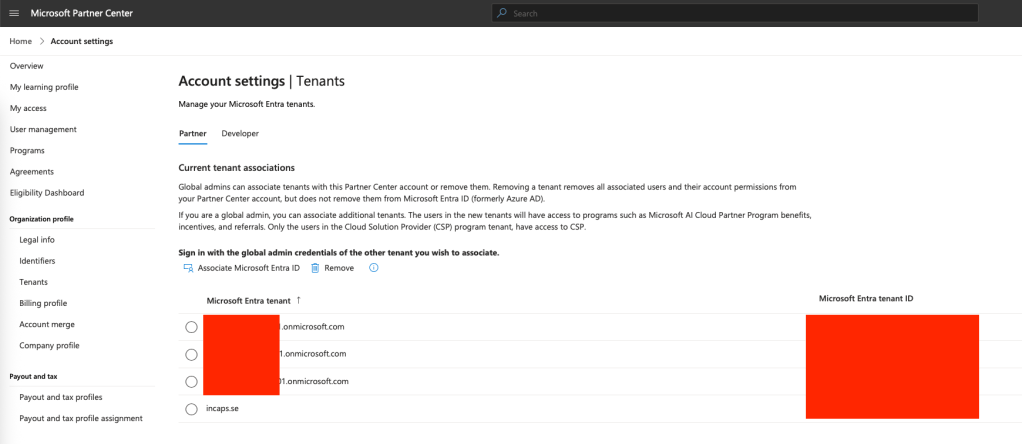
Once you’ve done that, log into the Microsoft Partner Center and go to Organization profile / Tenants.
Before you do anything else, take a note on the domain that is already here. This is your publisher domain and you will need it later.
Press the button that says “Associate Microsoft Entra ID” and then you login with your “Break The Glass” account, that is not the same account that you used to authenticate to the Microsoft Partner Center.
If everything goes well you will have your Entra External ID as an associated tenant.
Also make sure that you note down the MPN ID from the account settings. There are 2 different numbers and you want the Global one.
3. Setup Publisher Verification
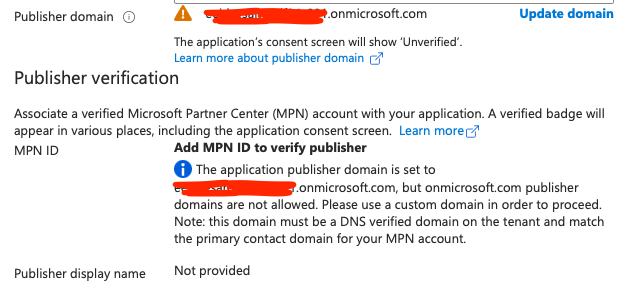
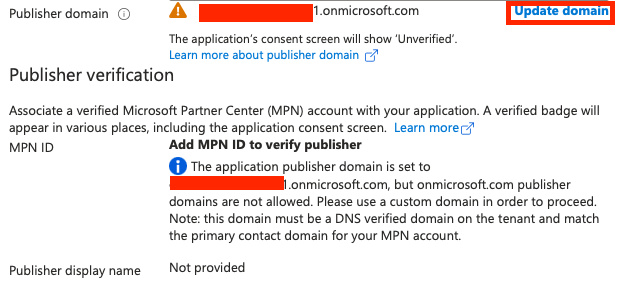
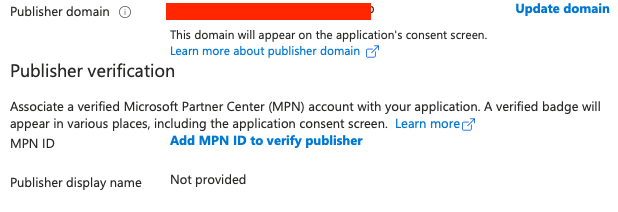
Log back into your Entra External ID and open the Application Registration that needs publisher verification. Where it says “Publisher domain” click the link that says “Update domain”.
Here is where it will get confusing.
I was under the impression that you first needed to register a custom domain for your tenant, and that you were going to verify that domain, but this is completely unnecessary. You only need a custom domain, if you want to host your Entra External ID on that domain, i.e. make your URL paths look good.
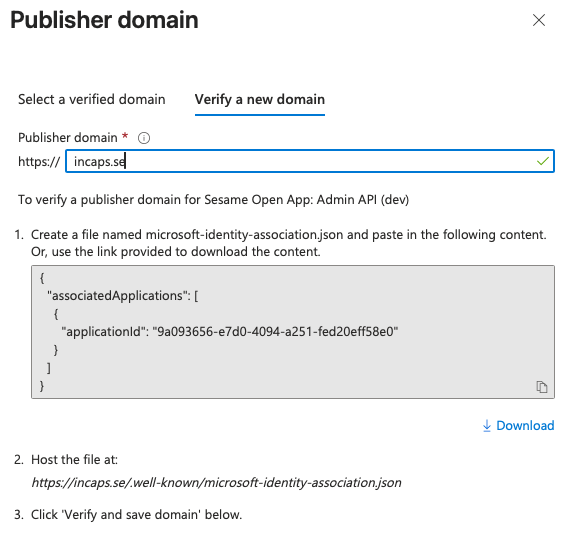
Instead you must select “Verify a new domain” and there you will type in the domain for your MPN account. The one you took note of earlier when you were associating your Entra External ID tenants with your MPN account. This is your publisher domain, and this is what you need to verify in the dialog below.
Again – this has nothing to do with custom domains for your Entra External ID. This verification is only for verifying the publisher domain. This is what had me confused.
Follow the instructions to verify the domain. It is kind of crazy that you need to upload a file, and cannot verify with DNS records, but I made it work.
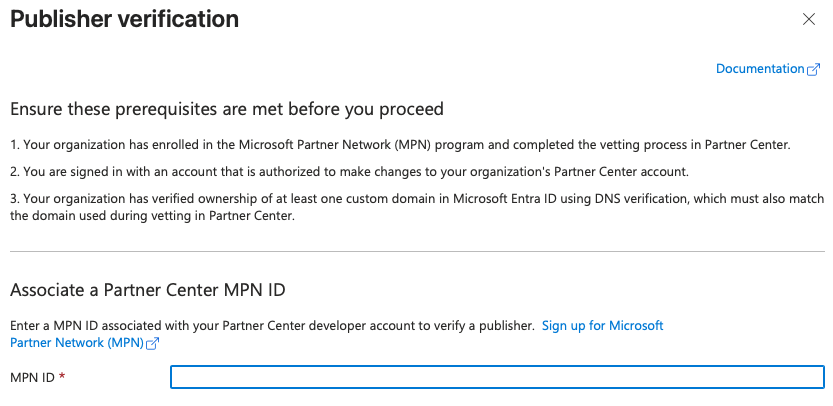
Once your domain is verified, you will get a new link to Add MPN ID to verify publisher.
You enter the MPN ID that you saved earlier and with a bit of luck, you should get a confirmation that you have confirmed your publisher status.
I hope this was any help to someone that’s in the same predicament as I was, registering a verified publisher on an Entra External ID tenant.
My previous blog post was talking about what Matrix is and why you would like to move from Slack and Teams to Matrix. This blog post will talk about my installation journey.
The normal path of installing Matrix is to deploy it on a Kubernetes cluster. This makes a lot of sense because you need 4-5 services in total to get it running. However, when I was looking up the Azure Kubernetes Service costs it would cost me about $100 per month and I was not willing to spend that much on this experiment. So I played with the idea of deploying on Azure App Service Plan instead.
High Level Architecture
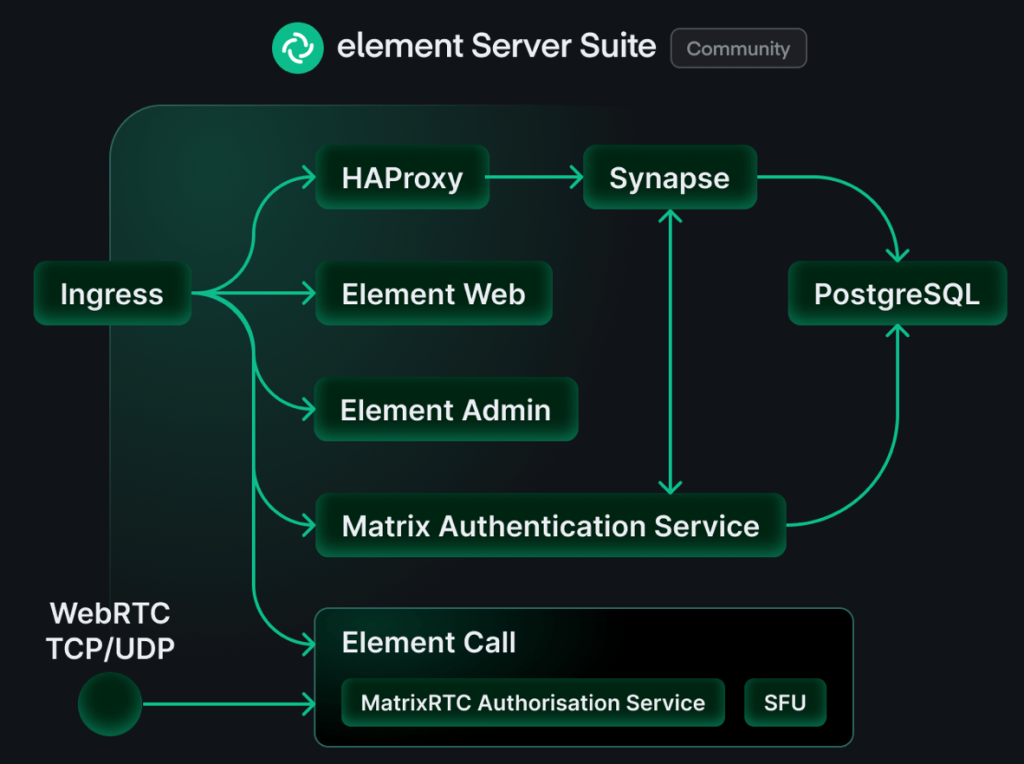
Here’s a high level image of the components of a Matrix system.
High level architecture of Matrix using the element server suite.
Synapse
This is the home server and it’s the core Matrix service. This one is responsible for routing all messages to the correct recipient and such. All the core functionality is here. It’s also the server that you connect your clients to.
Element Web
This is a web client for Matrix. Think of it as Slack in the web browser. This one is not really needed for the system to work, but I found it useful to setup as a way to test the system. Later I used Element desktop client and Element X iOS client exclusively.
Matrix Authentication Service (MAS)
This is where you create users and authenticate. This is absolutely needed and Synapse and MAS need to be integrated with one another to work properly.
PostgreSQL
It is possible to run Matrix on a file database like SQLite, but I don’t think it’s viable for a production setup. I did setup my own PostgreSQL and connected it to Matrix. More on that down below.
Element Call
I didn’t expect to be using audio or video conferencing in my experiment so I didn’t setup Element Call, but I think this is essential in a production setup.
Ingress
I thought I could manage without a dedicated ingress, but it became weird because my home server name and the address became different. My home server name was matrix.klabbet.dev but the address was synapse.matrix.klabbet.dev. I think setting up a dedicated nginx for ingress would have made much difference and I don’t think it would have been particularly hard neither.
Azure Architecture
Deciding to deploy Matrix on Azure to avoid Microsoft training AI on your data, or to become independent from Microsoft dominance with Teams, might seem to contradict the purpose – but the purpose here was to explore Matrix. If the goal was to reduce dependency to Microsoft I would’ve chosen a different hosting option.
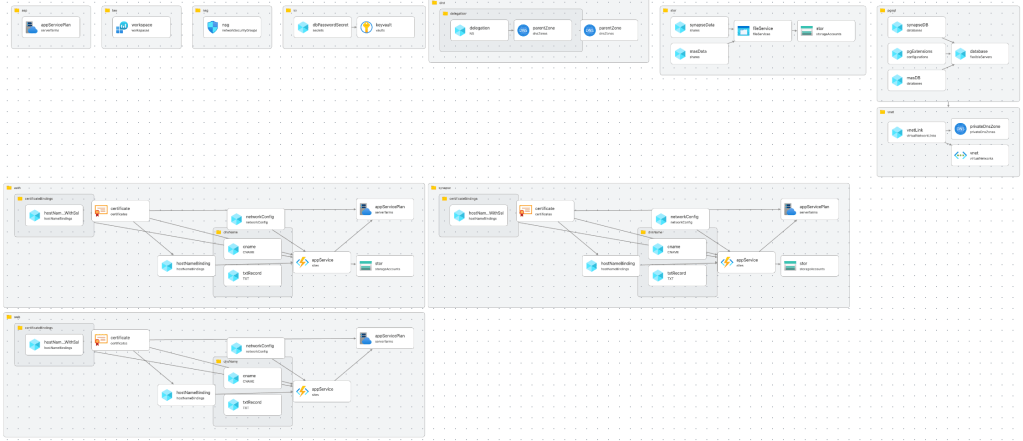
I used bicep to deploy resources for my Matrix setup to Azure. This is a visualization of my bicep project. It contains all the resources I deployed.
I will summarize the most important parts of the installation here. If you want the details you can find all the bicep scripts on my public repository on Github.
Virtual Network
First of all you need a virtual network to protect your storage account, key vault and the database. All communication from your app to these services must be private.
There are two subnets, one for the service, key vault and storage. The second subnet is for the database because it needs a delegation. It’s a bit overkill to use a /16 address space for the vnet and /24 for the subnets. You can without any trouble squeeze in everything into a much smaller address space. (just me being lazy)
You need to create a private DNS zone to link to your database.
resource privateDnsZone 'Microsoft.Network/privateDnsZones@2020-06-01' = {
  name: 'private.postgres.database.azure.com'
  location: 'global'
  tags: resourceGroup().tags
}

// Link the Private DNS Zone to your VNet
resource vnetLink 'Microsoft.Network/privateDnsZones/virtualNetworkLinks@2020-06-01' = {
  parent: privateDnsZone
  name: 'vnet-klabbet-matrix-prod-001-link'
  location: 'global'
  properties: {
    registrationEnabled: false
    virtualNetwork: {
      id: vnet.id
    }
  }
}
Storage Account
Synapse needs a storage account where it can store temporary files and media. I like Azure Storage Accounts because they’re so cheap. Here we create a file service for synapse data and MAS.
The network rule makes sure that you can only reach the data from within the subnet. Since the configuration files contains secrets, this is necessary.
I believe that it’s possible to replace the secrets in the config files with environment variables. In that case you could put the secrets in Azure Key Vault and have them injected when the service starts. This is worth exploring if running this in production.
PostgreSQL
I preferred setting up a hosted Azure Database for PostgreSQL. Partly because it’s much more performant than SQLite. You offload the application server a lot when you have a dedicated database. Also because you get some nice features with Azure PostgreSQL like backups and data encryption at rest.
You can supply your own keys for the encryption to make sure that Microsoft can’t read your data.
I create two databases on this database server. One for Synapse and one for MAS. The extension pg_trgm is needed for these services to work.
App Service Plan
I only set up one compute and I think that is enough. This is the smallest (and cheapest) compute that you can get Matrix to run on. It will cost you about $35 per month.
resource appServicePlan 'Microsoft.Web/serverfarms@2025-03-01' = {
  name: 'asp-klabbet-matrix-prod-001'
  location: resourceGroup().location
  tags: resourceGroup().tags
  sku: {
    name: 'B1'
    tier: 'Basic'
    capacity: 1
  }
  kind: 'linux'
  properties: {
    // must be true if linux
    reserved: true
  }
}
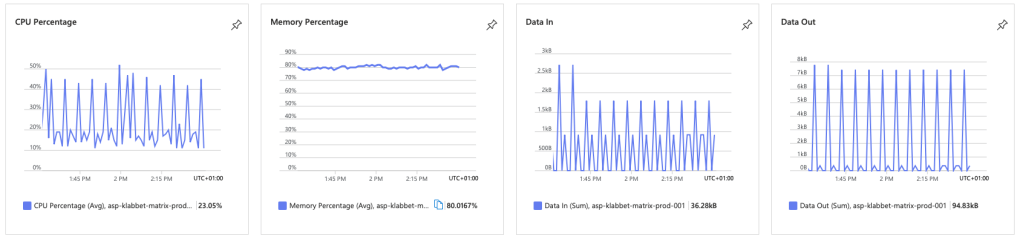
I actually never found any issues with running on this compute. Matrix does eat up a lot of resources, but the service never felt sluggish. Instead I was surprised with how responsive it was.
Matrix hogs all the available memory on my B1 instance and it consumes quite a lot of CPU. Regardless the service felt very snappy.
App Service
I setup Synapse, MAS and Element Web as App Services on the same App Service Plan. I will only show Synapse here, they are pretty much identical. If you want to see all of it, go to the Github repository and read the code.
In a production scenario you would not set docker container to latest version, but a specific version so you control when and how the service updates.
Here I connect the storage account to the docker container on the /data mount path. When Synapse starts it will go to this file service and look for homeserver.yaml for its configuration.
I also set up managed certificate and domain name for each app service. Go to the repo if you want to know how I did that.
Configuration
Once you have all the services up and running you need to configure both Synapse and MAS. You create configuration files that you drop in each file service where they are read during startup.
Synapse
You start by generating a basic configuration file by invoking the Docker container.
There are some parts here that aren’t standard. In order to get the database working with Azure Database for PostgreSQL you need to include allow_unsafe_locale: true.
Matrix Authentication Service (MAS)
You also need to generate a configuration file for MAS.
docker run ghcr.io/element-hq/matrix-authentication-service config generate > config.yaml
Unless you have an e-mail server you need to configure transport: blackhole. Then it is prefered if users need to register with their e-mail address. While setting up the server and the admin user you might need to have the following configuration
It makes sure that you can create an account without e-mail.
Upload the file to the MAS file service and call it config.yml for MAS to find it.
Summary
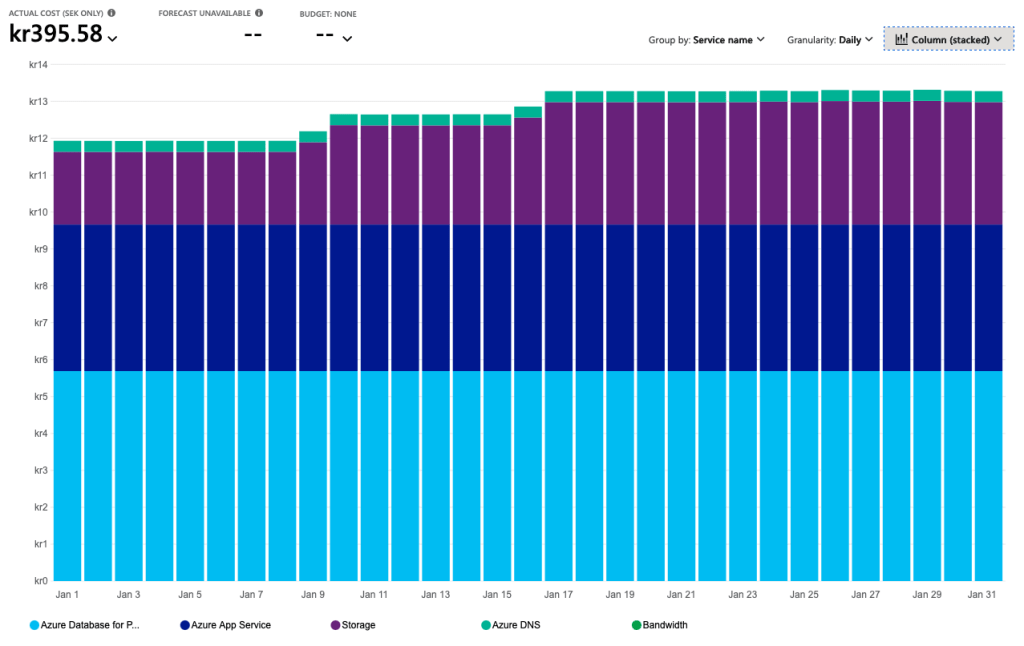
Installing Matrix on an Azure App Service Plan might not have been the best idea I had, but it works! It actually works very well and it saves me money. Instead of paying $100 per month for running it on the cheapest Azure Kubernetes Service, I get away with $44.
What I like about this setup is that costs will be quite flat. It will not really increase with time. After one week of active usage we managed to reach 12 MB on the database and 8 MB on the storage account. The database has 35GiB available and the Storage Account 100 TiB. It will take some time before we reach maximum capacity there ;D
This was a fun experiment. Things I would consider if doing this for a real production scenario
Not running it in Azure if the idea is to be independent from tech giants 🤣
Use Kubernetes as there are a more resources on getting it running on Kubernetes
Use an nginx reverse proxy for ingress to avoid having different server name and host
Install the Element Call as well for video conferencing
Make better use of Azure Key Vault by adding secrets as environment variables populated by AKV
This article was written without the use of generative AI.
I have finally collected all four Azure credentials that I’ve been seeking. This was my goal for the last 6 months, and I achieved it today 28 November 2025.
Let me tell you a bit on why it was important for me to get certified, and why I selected these four certifications.
An Azure certification is an important tool if you’re a contractor, because it acts as a credential when looking for contracts. For me as a freelance consultant, I don’t have a big firm validating my knowledge, but have to stand completely on my own merit. One way to get someone to vouch for you, is to take an Azure certification. That way, Microsoft vouch that I know these topics that I’m certified on.
If you’re not freelance like me, it can still be helpful to take a certification, to increase your value within the company. These certifications are counted towards the company’s Microsoft partner level, which comes with benefits. The certificates are also personal, so if you plan on looking for a new job, they are a merit in your job search and might land you a better offer.
I will give you my view on why these certificates are the most important for a software developer on the Microsoft stack.
Azure Administrator Associate
As a software developer this is a really cool certification as it helps you learn the things that you don’t come in contact with very often, like setting up an Azure subscription from scratch, Azure networking and how to secure your solution in Azure.
Even if this certificate is more directed at IT Operations, it’s knowledge that’s also very useful to know as a software developer.
Azure Developer Associate
This certification is a must have if you’re writing software that is run on Azure. It helps you understand how to write cloud native solutions, by utilizing the features that are provided in Azure. I have so many times seen developers reinventing the wheel, when there’s already a native Azure solution for the same problem.
This certification will help you learn about all those features, so you don’t have to implement them yourself.
Azure Solutions Architect Expert
If you are going to be consulting on Azure, you need to get this certification. It will help you get a grip on all the service offerings on Azure. You will get the birds eye view on governance, security and how Microsoft intends Azure to be used in an enterprise setting.
After completing this certification you will see Azure as a set of puzzle pieces and know how to fit them together into a working system.
DevOps Engineer Expert
This last certification, that I completed today, teaches you how to deliver software in a cloud environment. How can you shorten the cycle time, and at the same time increase quality and security in your software delivery pipeline.
Once you have these four certifications, you have a pretty good grip on how to develop, deliver and host software in a Microsoft setting.
I’ve been talking for years about getting the Solution Architect credential, but I’ve never put aside the amount of time needed. This latter half of this year I’ve decided to take 20% of the time I usually spend on clients and spend it on myself instead, and the first goal was to take the AZ-305 exam.
Note: I cannot say anything about the exam itself, as you’re made to sign an NDA not to, but I can tell you about my study path and how I first failed, and then succeeded.
This study path does not represent the knowledge you’re being tested on. I failed because I studied the wrong things. I got 634 points out of 1000 where 700 is the passing limit.
After failing I did a short retrospective with myself on what went wrong, found new resources to study and set at it again for another 3 weeks of intensive studying. I can be quite stubborn when my mind is set on something.
Second Try
I spent about 40 hours on my second round of studies. First of all I bought the MeasureUp AZ-305 Practice Test and I did all of the 168 questions in 4 sittings. The way I did it was that for every question, I pasted it into Chat GPT and then we discussed every possible answer, why it was right or wrong. This way I used the test to find my knowledge gaps. It was also a great way to discover and remember the things I got wrong, instead of just skipping to the next question. It helped me to get a better understanding about topics I’m not familiar with.
The practice questions can be questionable, but the act of going through and discussing them was most useful to me.
This was a great use case for AI, even if Chat GPT wasn’t always right, it helped me remember as I had to reason about the knowledge. I find that much better than just reading.
I should say, the MeasureUp test has questions that are close to the real exam, but some of the questions are infuriating, and I did find some that were plain wrong. While this sounds bad, getting angry is also a good way of remembering what you try to study.
After identifying my knowledge gaps I did a couple of labs in Azure. I setup scenarios in my own Azure tenant, created resources and tried different things. This was very useful for resources and features that I don’t use myself in my day-to-day work.
Availability sets, creating virtual machines in sets, setting up Azure Load Balancer and testing fail-over
Availability zones, creating virtual machines in different zones
Virtual machine scale sets, setting up an autoscaling cluster of machines
Azure Site Recovery, setting up replication of a machine in a different region
Azure Backup, playing around with the different backup options
Azure SQL where I setup different configurations of single Azure SQL, DTU tier, vCore Tier, Elastic Pool and Managed Instance
Azure Policy and Initiatives, creating policies and applying them to my subscriptions
I wanted to play around more with Microsoft Entra ID, but most of the things I wanted to lab with requires a P2 license, like conditional access, access reviews, PIM and ID Protection.
Another thing I did was I watched John Savill’s study cram on YouTube. While it’s very high level and not detailed enough to pass the exam, I found that sometimes he was saying things I didn’t know about, so I went ahead and looked it up to learn about it. I watched this during my commute over a span of 3 weeks.
John Savill is the GOAT for making these study cram videos. I think it was good repetition of the basics before the exam.
The last thing I did was that I got the AZ-305 Exam ref from Amazon. First I thought it was a waste of money, because it would be delivered before the day of my exam, but it arrived early and I spent a couple of evenings reading it through.
While it doesn’t contain all the details you need to know, it’s still a very good and dense walkthrough of everything on a high level, and sometimes very detailed as well. I can recommend getting it if you’re struggling with the exam.
The exam ref has all the bullet points of what you need to know. Maybe not all the details, but it’ it’s a good starting point.
With all this studying I was much more confident on my second try and I finished with 844 points out of 1000 where 700 is the passing score.
Summary
I think this certificate was quite hard, the hardest yet. The reason for me saying so, is that in my previous certificates Administrator and Developer I’ve felt quite at home by using the technology in my daily job. In this certificate they test that you know much about all of Azure, not only the parts that you are comfortable with.
It took me about 80 hours of effective study time to learn everything I needed and I don’t think it’s something that anyone would pass without study. Everyone has their part of Azure they’re comfortable with, and this tests on the whole platform.
Now I have the Administrator, the Developer and the Solution Architect certifications. The only one left that I’m interested in is the DevOps certificate so I guess I’ll do that next.
Today I passed my AZ-204: Developing Solutions for Microsoft Azure exam and became an Azure Developer Associate. I’ve done some certifications in my days, but this was by far the hardest. The breadth of the knowledge required, Azure SDKs, data storage, data connections, APIs, authentication, authorisation, compute, containers, deployment performance and monitoring – combined with the extreme details in the questions, made this really hard. I didn’t think that I passed until I got my result.
These were the kind of questions that were asked
Case studies: Read up on a case study and answer questions on how to solve the client’s particular problems with Azure services. Questions like, what storage technology is appropriate, what service tier should you recommend, and such.
Many questions about the capabilities of different services. Like, what event passing service should you use if you need guaranteed FIFO (first-in, first-out)
How to setup a particular scenario. Like what order you should create services in order to solve the problem at hand. Some of these questions where down to CLI commands, so make sure that you’ve dipped your toes into Azure CLI.
Code questions where you need to fill in the blanks on how to connect and send messages on a service bus, or provision a set of services with an ARM template. You also get code questions where you should answer questions about the result of the code.
Because of the huge area of expertise and the extreme details of the questions, I don’t think you could study and pass the exam without hands-on development experience. If I were to give advice on what to study it would be
Go through the Online – Free preparation material. Make sure you remember the capabilities of each service, how they differentiate, and what features higher pricing tiers enables. Those questions are guaranteed.
Do some exercises on connecting Azure Functions, blob storage, service bus, queue storage, event grid and event hub. These were central in the exam.
Make sure you know how to manage authorisation to services like blob storage and the benefits of the different ways to do it. Know your Azure KeyVault as the security questions emphasise on this.
I have during January spent a lot of time thinking about, reading about and setting up a Service Level Agreement. The purpose is to agree on measurable metrics like uptime, responsiveness and responsibilities with your paying clients.
If it’s done right, it will influence how those clients prefer to interface to you. If they do it synchronously, asynchronously, put a cache in-between or have a failsafe.
Here I will write some general insights that I got from this process. If you want my complete SLA convention, you should check out my wiki. There I’ve also posted a sample SLA that you can reuse for your own purposes.
Always Start with Metrics
Before you dig into availability and 99.99999% you must start with metrics. What does availability mean to you? How do you measure it? What is an error? Is http status 404 an error? Does errors during maintenance count towards your metric? How is request latency measured? Is it measured on the client or the server? Do you measure the average on all the requests? How does a cold start latency affect your metric?
There are a lot of things to unpack before you can start thinking about objectives.
Should an 8 second cold start in the middle of the night affect you reaching your SLA objectives?
Not as Available as you Think
Everywhere you look businesses offer a 99,95% availability. Translated, it means 5 minutes and 2 seconds downtime weekly. A common misconception from developers is that it’s easy – All our deploys are automated anyway and if one fails, we’ll just rollback.
Before you set that objective you should consider
When the service goes down in the middle of the night, how much time does it take to wake somebody up to take look at the problem?
When the service goes down Saturday morning, do you have people working through the weekend to get the service up and running again?
Your availability is dependent on the availability of all the services you depend on. If you host on Azure Kubernetes which offers 99,95% availability, you cannot offer the same because Microsoft will eat up your whole failure budget.
Be kind to yourself. Don’t overpromise
Set an objective that promises availability within business hours, when you have developers awake that can work on the problem.
Pay people to be on-call when you need to offer availability off-hours.
Multiply availability of your dependent services with each other, and then with your own availability to reach a reasonable number. And then give yourself some slack. An objective should not be impossible or even challenging.
Azure Kubernetes = 99.95%
Azure MySQL = 99.9%
Azure API Management = 99.95%
My availability = 99%

Total Availability = 99.95% * 99.9% * 99.95% * 99% = 98.8%
Every Metric must be Measured
This sound so obvious, how can you know that you meet the objective unless you measure the metric? Still I rarely see anyone measuring their service level indicators. Maybe they don’t want to know.
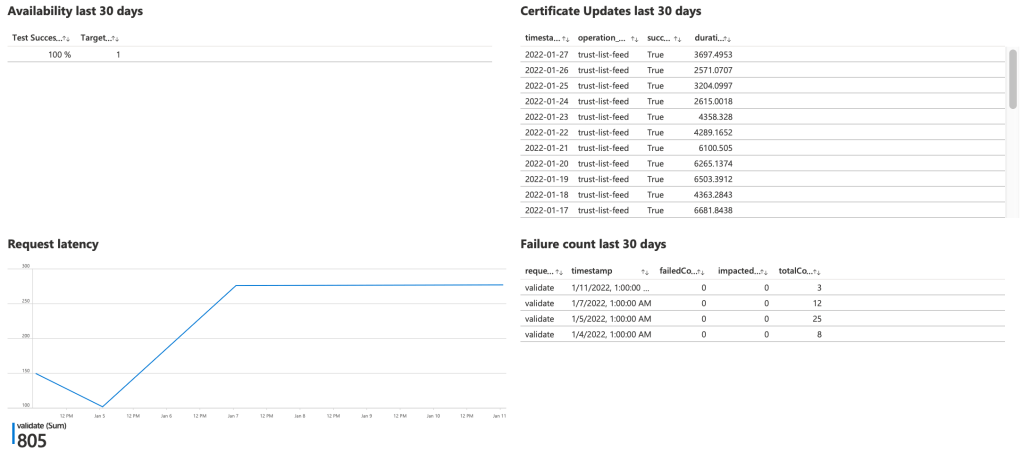
If you are using a cloud provider like Microsoft Azure, you can setup workbooks to measure your metrics. I’m a proponent of giving my clients access to these workbooks so they can see that we live up to the SLA.
A dashboard that is automatically updated with the metrics from our service license agreement.
The Client Also have Responsibilities
An agreement goes both ways, and in order for you as a vendor to fulfil your part of the agreement you need to put some requirements on the client.
Define a reasonable workload that the client is allowed to put on your service for the objectives to be obtainable. You can set a limit of 100 requests/second and refuse excess requests. Those errors do not count towards your error budget.
The client should be responsible for adjusting their service clients to updates in your API. You don’t want to maintain a 5 year old version of your system.
Reparations should Repair not Bankrupt
I’ve seen so many service license agreements that include a fine if the objectives are not met, and often those fines are quite high. They seldom define how often a client can request a payout, and together with badly defined objectives, a client could drive a service provider into bankruptcy.
That is not beneficial to anyone, so please stop writing SLAs with harsh penalties. You should try to repair and not bankrupt
How much damage was caused by the outage?
Can we update the service level objectives to become more reasonable?
Can the client adjust their use of our service to better fit our new objectives?
Is the client open to paying more so we can have a service technician on-call?
Summary
Writing an SLA is hard. It requires experience from both the legal team and IT operations. Availability is not an objective that a client can demand of your service. It must be negotiated and carefully weighed between IT operations environment, support organization and costs.
There’s nothing inherently wrong with handing out developer access to each resource and resource group they need. You will have a mess of access rights spread all over, but you will easily revoke access by removing developers from the subscription.
If you need to manage privileges in a structured way, it is less than ideal. That is why I have developed a convention for managing access in our Azure subscription. It’s quite easy.
For each resource group, create one user group with contributor role, and use the following name format.
The name format of a user group.
Let’s break it down
Project Name and Component Name should be exactly the same as the resource group name.
Environment, I usually go with dev and prod. I have never come across a situation where I needed to hand out access specifically to test or stage. So dev means dev & test where prod means stage & prod.
Contributor is useful to have if you need to hand out access for more roles later. For me, the most common access role after contributor has been monitoring.
UG is the user group suffix, which helps you deal with these in Azure API scenarios.
There will be one user group for every resource group.
Assigning Access
You can now assign access to the user groups instead of the Azure resources directly.
Assigning user access to user groups instead of direct access to resource groups.
Managing access will become much easier.
Groups of Groups
Doing this will unlock the potential of combining user groups into larger user groups. If the project “Klabbet” has both a web and api component, we can create a user group that will give developers access to both.
We can combine user groups into more permissive user groups.
By combining user groups into larger user groups we will get better control of what kind of access a user has, without investing too much effort.
One user group assignment will give the user access to 4 resource groups.
Summary
I’ve presented you a format for access control that does not require much effort to setup, but provides lots of flexibility to take control of your access control.
If you’re interested in my convention for access control you can find the specification here.
I’ve had the benefit of stepping in to other developers’ Azure accounts, and it’s very much like opening up someones brain and taking a peek inside.
There are some bits ordered here and there, but it’s mostly chaos.
If it’s setup by someone with experience you will notice an intention of following conventions because they’ve seen first hand how quickly it gets out of hand. When there are more than one contributor, you will start noticing different patterns depending on which person set it up.
Most Azure resources are hard to move and rename. If you do something wrong you will need to delete and recreate the resource which often isn’t worth the trouble.
Here follows my convention. If you don’t like it, feel free to create your own. The most important thing is not how resources are named, but that the convention is followed so they’re named the same way.
I want you to think about the subscription as “who gets the invoice?”. Not which department is going to bear the cost, but the actual invoice. Depending on your organization structure you need 1 subscription, or you’ll need 10.
It is not uncommon to have one financial department that will receive the invoice and split the costs on different cost units. It is also not uncommon to have 4 different legal entities and invoicing them separately.
If you as a consultant are doing work for a client that doesn’t have their own subscription, create a subscription for them. You will have all the costs neatly gathered, and you can easily hand it over when the project is done.
I have two subscriptions, one for each of my companies.
Resource Groups
I structure my resource groups like this.
Let’s unpack this a bit
Project Name, is the name of the application, project, website. I place this first, because when I’m searching for a resource group I will always start looking for the name of the application.
Component Name, is optional. Sometimes you don’t need it, but most of the time there are several components in a project. A web, an API, a BI component.
Environment, will be dev, test, stage or prod. I place different environments in different resource groups to make it easier to tear down one environment and rebuild another. It helps with keeping environments isolated and access control on the environment level.
Rg, to make it easier to recognise a resource group in az cli and other API scenarios.
A note on isolating environments. It drive cost up when you won’t share app service plans between dev and test. In my experience dev/test resources are cheap and it doesn’t cost much to duplicate them. The benefit of completely isolated environments is greater than the cost of split resources.
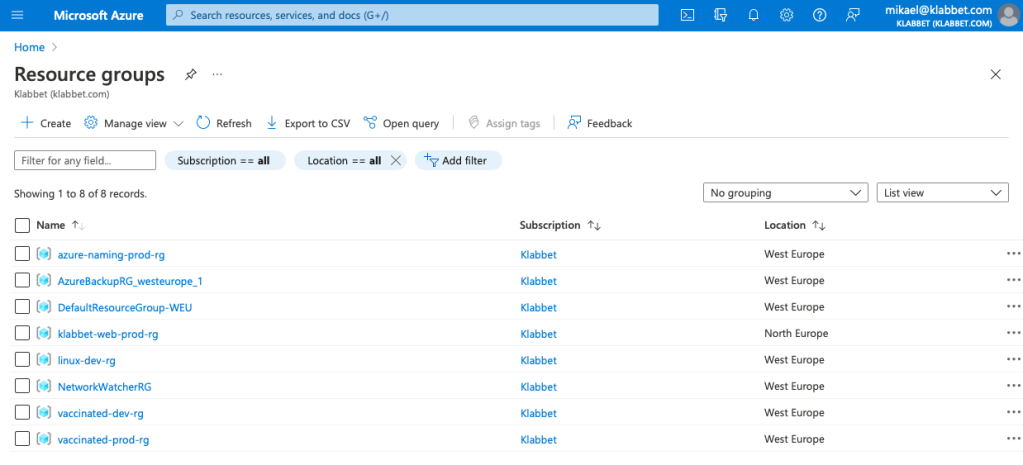
In my small Klabbet subscription it looks like this.
Sometimes Azure creates resource groups for you like AzureBackupRG_westeurope_1. Just leave it. It is not worth the trouble to change it for OCD purposes.
This scales well with hundreds of resource groups thanks to the filter functionality. Writing vaccinated in the filter box, will help me to quickly identify all resource groups belonging to that project.
Resource Names
Now we’ve made sure each resource group only contains resources for a specific application, component, environment. It will make the number of resources in each group much fewer and easier to overview.
I have a naming convention for azure resources as well. (looks very much like the previous one)
Project name, component name and environment in the resource name is useful for working with az cli and Azure APIs. The resource name abbreviation should be picked for the Microsoft recommended abbreviations. If your resource doesn’t have an official abbreviation, make your own and document it in your convention.
Don’t worry about Azure creating resources that doesn’t follow your naming convention. That is fine.
Tagging
Tagging is often forgotten, even if you’re reminded every time you create a new resource. *hint* *hint* Tagging is extremely useful. Here are my standard tags that I put on all resources.
Name
Example
Comment
Application
Vaccinated
Boss comes in and say: “I want to know exactly how much this project has cost us.” You filter cost analysis on the Application tag.
Environment
prod
Being able to split cost analysis on different environments is golden.
Organization
Klabbet
You will always host only 1 organization within this subscription, until you’re not. When you’re going to create that first cost report, you’ll be glad that you did tag Organization from the start.
Other suggested tags “Business Unit”, “Component”, “Country” if you have an org with different departments, work on different components or is multi-national.
Tagging is for reporting, so make sure that you think of what your boss might come ask of you when you setup which tags are mandatory.
Now we can filter or group our expense reports on these tags.
Vaccinated was one failure of a project. How much should we blame marketing department for that!? Well 600 SEK worth!
Summary
This blog post has been going through my preferred way of getting order in my Azure account, making it easy to find things and tagging things to make reporting easier.
This might not be your preferred way, but it is has proven itself useful to me.